%22%20fill%3D%22rgb(0%2C0%2C0)%22%20d%3D%22M%201708.71%2032.0719%20L%201711.17%2032.1726%20L%201711.48%2033.8726%20C%201698.63%2068.7557%201678.15%20111.062%201663.25%20146.038%20L%201610.27%20270.222%20C%201600.68%20293.044%201548.56%20422.248%201540.04%20431.57%20C%201533.67%20438.547%201128.18%20599.98%201082.51%20618.503%20L%20896.13%20695.087%20C%20861.529%20708.971%20827.042%20723.139%20792.674%20737.591%20C%20773.372%20745.745%20749.086%20754.449%20732.134%20766.537%20C%20692.666%20794.684%20697.752%20841.911%20698.601%20884.356%20C%20699.702%20939.367%20740.841%20953.958%20782.454%20976.677%20L%20861.67%201020.18%20L%201099.89%201152.37%20C%201107.22%201156.5%201119.88%201164.35%201127.14%201167.58%20C%201169.86%201186.61%201146.74%201195.41%201117.9%201208.29%20C%201100.37%201216.11%201079.03%201225.42%201060.64%201233.58%20C%201010.18%201256.26%20959.538%201278.54%20908.726%201300.43%20C%20894.529%201306.71%20881.754%201312.22%20867.258%201317.69%20C%20862.804%201316.04%20858.4%201314.27%20854.051%201312.36%20C%20836.181%201304.32%20811.094%201289.47%20793.048%201279.86%20L%20667.457%201213.33%20L%20559.157%201156.4%20C%20524.558%201137.94%20487.124%201123.47%20472.687%201083.79%20C%20469.558%201074.97%20467.621%201065.77%20466.927%201056.43%20C%20465.765%201038.59%20466.66%201011.98%20466.668%20993.332%20L%20466.359%20873.615%20C%20465.984%20815.652%20463.947%20757.728%20465.485%20699.747%20C%20465.795%20688.052%20466.054%20675.662%20467.175%20664.054%20C%20469.31%20640.858%20475.406%20618.2%20485.2%20597.064%20C%20517.254%20527.676%20568.707%20508.151%20633.929%20480.324%20L%20726.507%20441.167%20L%201040.13%20310.018%20L%201452.31%20137.782%20L%201616.93%2069.4204%20C%201646.93%2057.0612%201678.5%2043.152%201708.71%2032.0719%20z%22%2F%3E%0D%0A%3Cpath%20transform%3D%22translate(0%2C0)%22%20fill%3D%22rgb(0%2C0%2C0)%22%20d%3D%22M%201180.36%20731.182%20C%201195.24%20733.945%201233.7%20756.876%201248.98%20765.026%20L%201364.16%20826.126%20L%201484.37%20889.381%20C%201498.57%20896.955%201532.42%20914.303%201544.52%20923.261%20C%201557.39%20932.823%201567.44%20945.681%201573.6%20960.477%20C%201577.74%20970.613%201580.28%20981.333%201581.12%20992.25%20C%201582.2%201006.88%201581.3%201032.21%201581.31%201047.95%20L%201581.63%201160.97%20C%201582.26%201211.62%201582.57%201262.29%201582.57%201312.95%20C%201582.44%201333.48%201582.84%201362.18%201581%201382.38%20C%201579.14%201403.66%201573.97%201424.53%201565.69%201444.23%20C%201551.08%201479.78%201525.53%201509.75%201492.74%201529.79%20C%201460.17%201549.9%201412.55%201568.06%201376.2%201583.68%20C%201297.89%201617.01%201219.4%201649.9%201140.72%201682.34%20L%20334.313%202018.15%20C%20339.936%202006.05%20344.516%201995.06%20349.5%201982.67%20C%20380.898%201908.42%20413.985%201834.57%20445.11%201760.02%20C%20459.052%201725.94%20473.375%201692.02%20488.076%201658.26%20C%20492.996%201647.05%20502.305%201624.37%20508.527%201614.93%20C%20525.371%201606.59%20557.563%201594.41%20575.732%201586.98%20L%20705.864%201534%20C%20845.58%201478.27%20984.961%201421.71%201124%201364.32%20L%201246.78%201313.94%20C%201290.4%201295.55%201343.27%201280.12%201348.5%201224.17%20C%201350.49%201202.85%201351.54%201164.6%201346.69%201143.96%20C%201344.6%201134.87%201340.77%201126.27%201335.41%201118.63%20C%201321.45%201099.1%201289.07%201084.29%201267.79%201072.67%20L%201188.51%201029.14%20L%20997.495%20923.267%20L%20933.233%20887.54%20C%20924.86%20882.894%20890.238%20867.795%20898.045%20858.391%20C%20907.874%20846.549%20953.243%20829.416%20967.235%20823.263%20L%201064.01%20780.291%20C%201087.5%20769.837%201111.05%20759.524%201134.65%20749.351%20C%201147.99%20743.555%201166.91%20734.741%201180.36%20731.182%20z%22%2F%3E%0D%0A%3C%2Fsvg%3E)
%22%20fill%3D%22rgb(255%2C255%2C255)%22%20d%3D%22M%201708.71%2032.0719%20L%201711.17%2032.1726%20L%201711.48%2033.8726%20C%201698.63%2068.7557%201678.15%20111.062%201663.25%20146.038%20L%201610.27%20270.222%20C%201600.68%20293.044%201548.56%20422.248%201540.04%20431.57%20C%201533.67%20438.547%201128.18%20599.98%201082.51%20618.503%20L%20896.13%20695.087%20C%20861.529%20708.971%20827.042%20723.139%20792.674%20737.591%20C%20773.372%20745.745%20749.086%20754.449%20732.134%20766.537%20C%20692.666%20794.684%20697.752%20841.911%20698.601%20884.356%20C%20699.702%20939.367%20740.841%20953.958%20782.454%20976.677%20L%20861.67%201020.18%20L%201099.89%201152.37%20C%201107.22%201156.5%201119.88%201164.35%201127.14%201167.58%20C%201169.86%201186.61%201146.74%201195.41%201117.9%201208.29%20C%201100.37%201216.11%201079.03%201225.42%201060.64%201233.58%20C%201010.18%201256.26%20959.538%201278.54%20908.726%201300.43%20C%20894.529%201306.71%20881.754%201312.22%20867.258%201317.69%20C%20862.804%201316.04%20858.4%201314.27%20854.051%201312.36%20C%20836.181%201304.32%20811.094%201289.47%20793.048%201279.86%20L%20667.457%201213.33%20L%20559.157%201156.4%20C%20524.558%201137.94%20487.124%201123.47%20472.687%201083.79%20C%20469.558%201074.97%20467.621%201065.77%20466.927%201056.43%20C%20465.765%201038.59%20466.66%201011.98%20466.668%20993.332%20L%20466.359%20873.615%20C%20465.984%20815.652%20463.947%20757.728%20465.485%20699.747%20C%20465.795%20688.052%20466.054%20675.662%20467.175%20664.054%20C%20469.31%20640.858%20475.406%20618.2%20485.2%20597.064%20C%20517.254%20527.676%20568.707%20508.151%20633.929%20480.324%20L%20726.507%20441.167%20L%201040.13%20310.018%20L%201452.31%20137.782%20L%201616.93%2069.4204%20C%201646.93%2057.0612%201678.5%2043.152%201708.71%2032.0719%20z%22%2F%3E%0D%0A%3Cpath%20transform%3D%22translate(0%2C0)%22%20fill%3D%22rgb(255%2C255%2C255)%22%20d%3D%22M%201180.36%20731.182%20C%201195.24%20733.945%201233.7%20756.876%201248.98%20765.026%20L%201364.16%20826.126%20L%201484.37%20889.381%20C%201498.57%20896.955%201532.42%20914.303%201544.52%20923.261%20C%201557.39%20932.823%201567.44%20945.681%201573.6%20960.477%20C%201577.74%20970.613%201580.28%20981.333%201581.12%20992.25%20C%201582.2%201006.88%201581.3%201032.21%201581.31%201047.95%20L%201581.63%201160.97%20C%201582.26%201211.62%201582.57%201262.29%201582.57%201312.95%20C%201582.44%201333.48%201582.84%201362.18%201581%201382.38%20C%201579.14%201403.66%201573.97%201424.53%201565.69%201444.23%20C%201551.08%201479.78%201525.53%201509.75%201492.74%201529.79%20C%201460.17%201549.9%201412.55%201568.06%201376.2%201583.68%20C%201297.89%201617.01%201219.4%201649.9%201140.72%201682.34%20L%20334.313%202018.15%20C%20339.936%202006.05%20344.516%201995.06%20349.5%201982.67%20C%20380.898%201908.42%20413.985%201834.57%20445.11%201760.02%20C%20459.052%201725.94%20473.375%201692.02%20488.076%201658.26%20C%20492.996%201647.05%20502.305%201624.37%20508.527%201614.93%20C%20525.371%201606.59%20557.563%201594.41%20575.732%201586.98%20L%20705.864%201534%20C%20845.58%201478.27%20984.961%201421.71%201124%201364.32%20L%201246.78%201313.94%20C%201290.4%201295.55%201343.27%201280.12%201348.5%201224.17%20C%201350.49%201202.85%201351.54%201164.6%201346.69%201143.96%20C%201344.6%201134.87%201340.77%201126.27%201335.41%201118.63%20C%201321.45%201099.1%201289.07%201084.29%201267.79%201072.67%20L%201188.51%201029.14%20L%20997.495%20923.267%20L%20933.233%20887.54%20C%20924.86%20882.894%20890.238%20867.795%20898.045%20858.391%20C%20907.874%20846.549%20953.243%20829.416%20967.235%20823.263%20L%201064.01%20780.291%20C%201087.5%20769.837%201111.05%20759.524%201134.65%20749.351%20C%201147.99%20743.555%201166.91%20734.741%201180.36%20731.182%20z%22%2F%3E%0D%0A%3C%2Fsvg%3E)

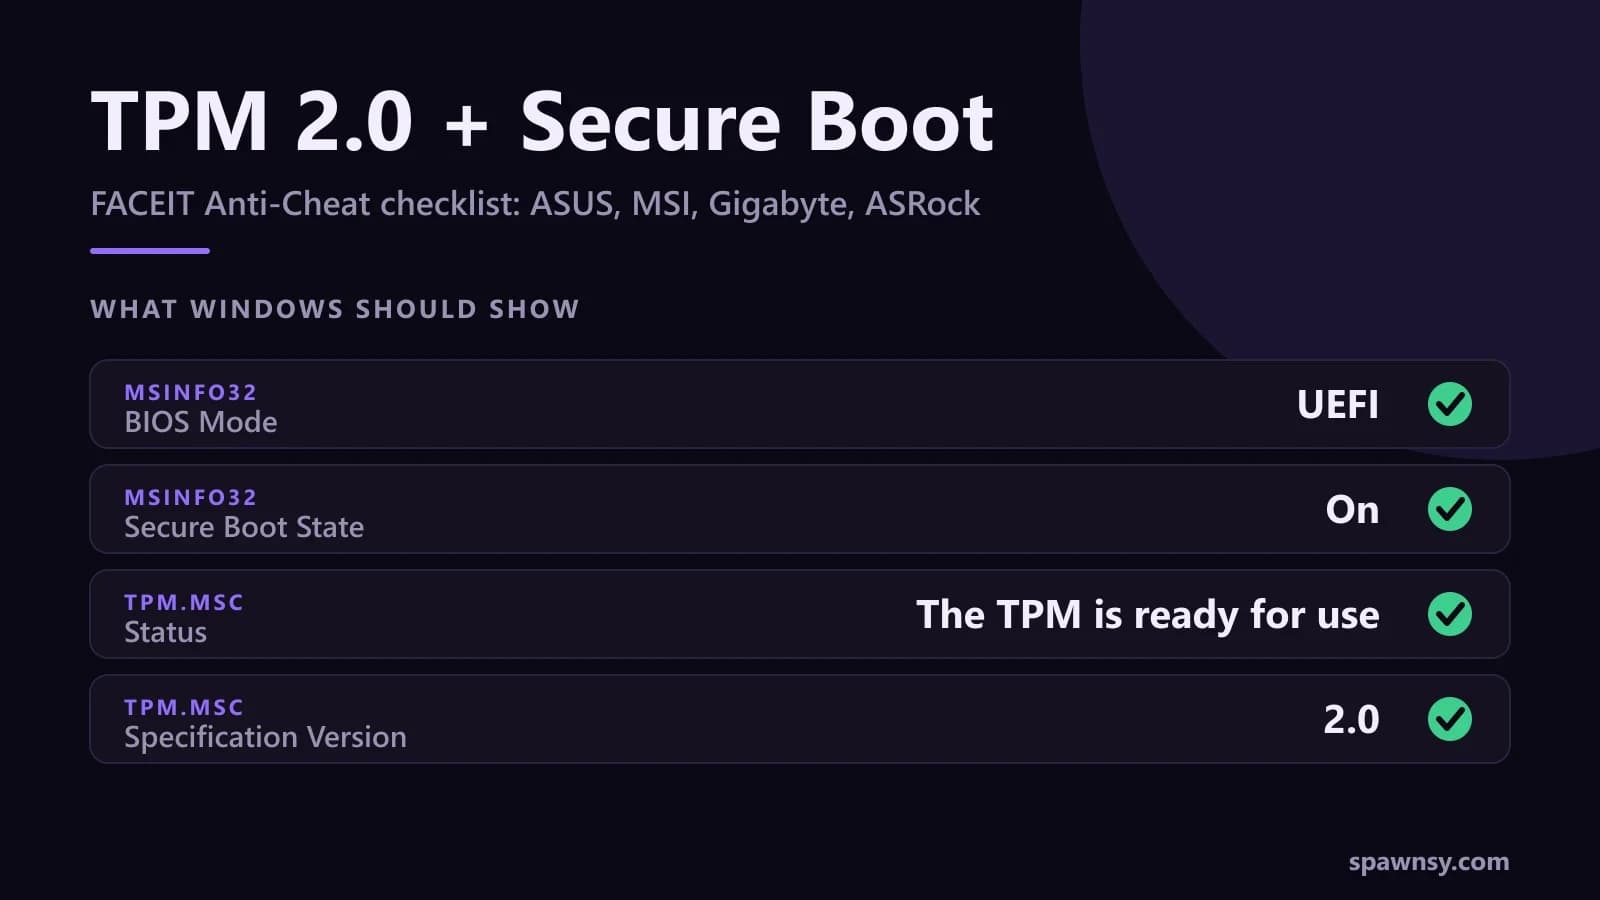
If FACEIT Anti-Cheat stops you with a message about TPM or Secure Boot, the problem usually comes down to two switches in your BIOS and a few minutes. Both have been mandatory for every player since 25 November 2025, and FACEIT's own guide gives menu paths for only a handful of vendors before pointing to general instructions. We collected them for the four most common motherboard brands, ASUS, MSI, Gigabyte and ASRock, from the manufacturers' official instructions, and checked what each screenshot really shows. At the end there is a section on Secure Boot certificates: one of them expires on 19 October 2026, four days from now.
What FACEIT requires in October 2026
According to FACEIT's official article, since 25 November 2025 every player has to have TPM 2.0 and Secure Boot enabled. Together they produce a report confirming the PC started up without loading unauthorised or modified software, and the anti-cheat checks it before letting you into a match. IOMMU and VBS come on top, introduced in waves: in October 2025 they were required of 60% of players, and since August 2025 of everyone above 3,000 ELO. Later waves will cover further groups.
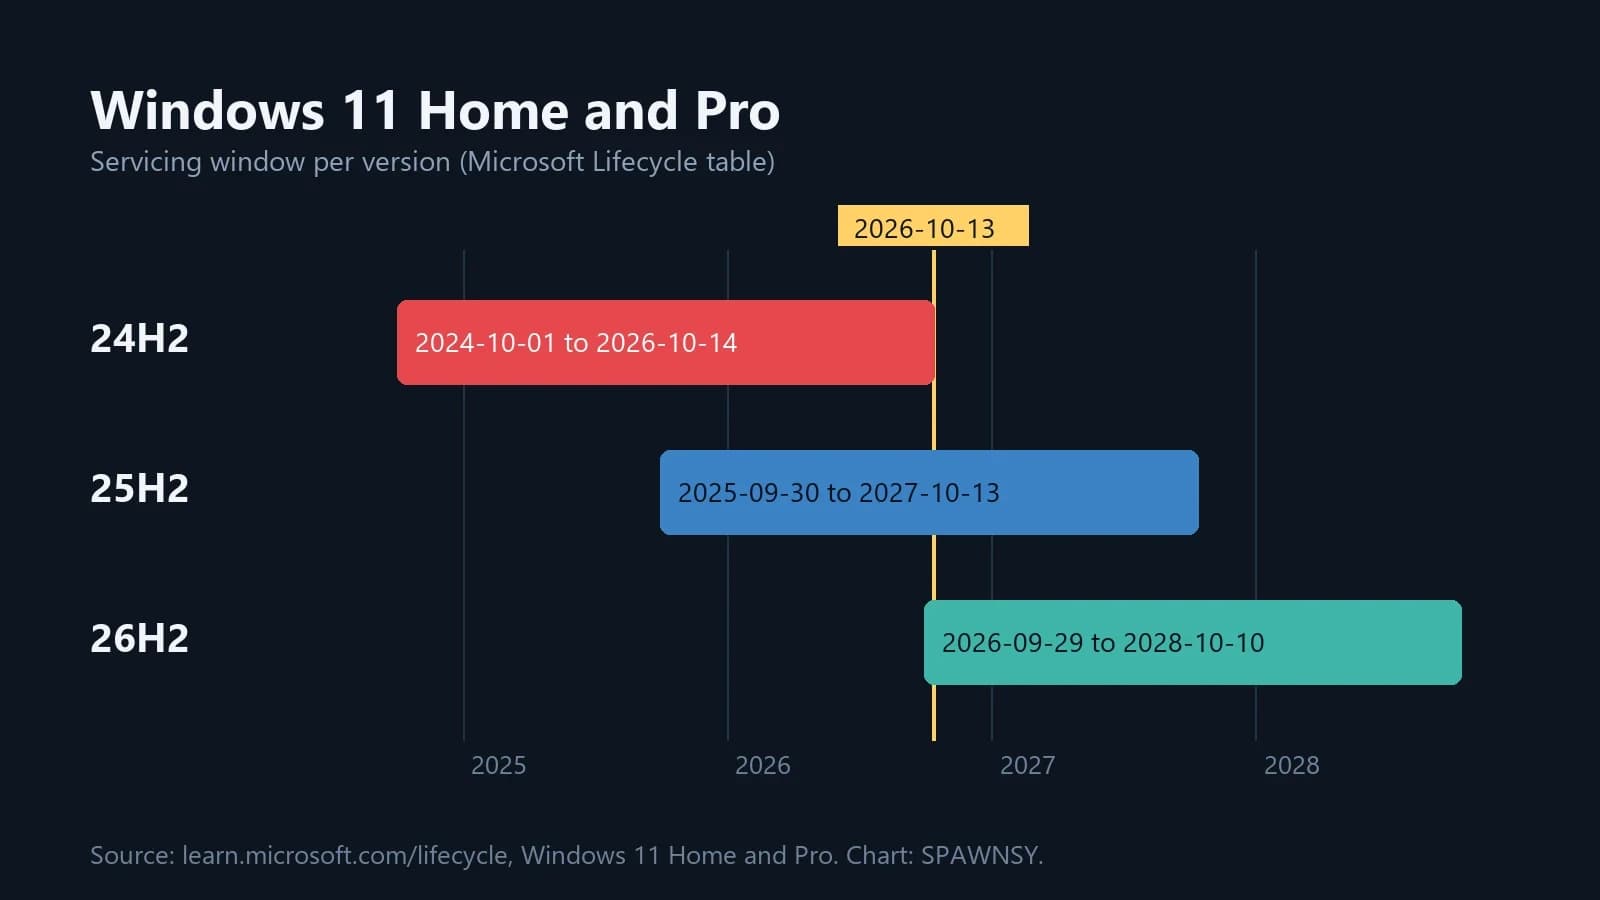
The operating system matters too. FACEIT's FAQ says that from 14 October 2026 Windows 10 must be version 22H2 with Extended Security Updates enabled, and Windows 11 becomes mandatory in October 2027. We covered it in more depth in our piece on Windows 10, 22H2 and ESU on FACEIT. This guide is about hardware, meaning the BIOS.
Step 1: the BitLocker key, before you touch the BIOS
On ASUS boards a warning screen appears the moment you enable Intel PTT: it says the TPM key is stored in Intel ME memory, and that if the recovery key is lost or the BIOS chip is replaced, the system will not boot and the data stays encrypted with no way to restore it. That is why this step comes first.
Step 2: check what is already on
The table below collects the checks from FACEIT's official article. The first three take two minutes and do not require entering the BIOS.
Press the Windows key, type msinfo32 and press Enter, then find the BIOS Mode and Secure Boot State rows in the system summary. Next, run tpm.msc the same way. If Windows reports it cannot find a compatible TPM, the chip is most often switched off in the BIOS. A healthy result looks like this:
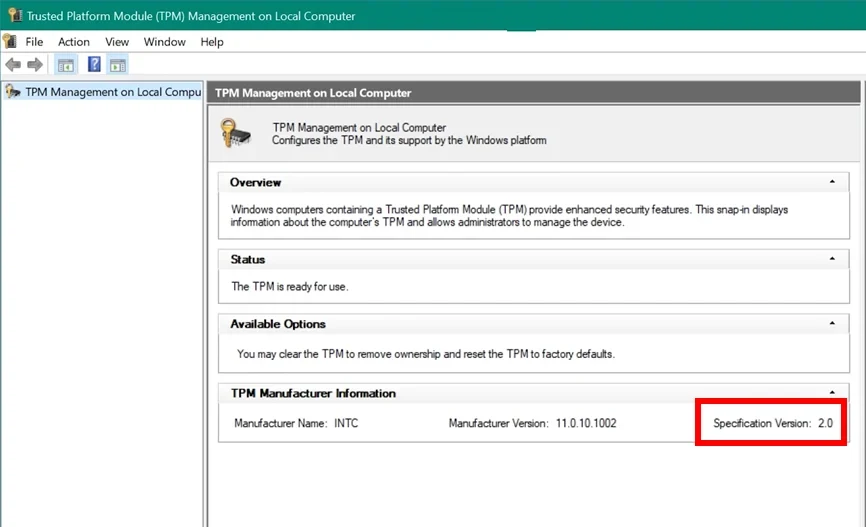
If FACEIT still complains despite correct values in tpm.msc, open Windows Security, go to Device Security and choose Security processor details. Attestation and Storage should both show Ready. If they do not, jump to the errors section below.
Step 3: UEFI and a GPT disk
Secure Boot only works when BIOS Mode in msinfo32 shows UEFI and the system disk uses the GPT partition table. If you see Legacy and the disk is in the old MBR format, simply switching the BIOS to UEFI will break Windows startup. Board makers repeat this in every guide, and FACEIT describes this mismatch as the usual cause of a PC that will not boot after Secure Boot is enabled.
Microsoft provides a tool for this, MBR2GPT. From a running Windows it works with the /allowFullOS switch. To check whether the disk qualifies, run mbr2gpt /validate /disk:0 /allowFullOS in a command prompt opened as administrator, and the conversion itself is mbr2gpt /convert /disk:0 /allowFullOS. Check disk number 0 in Disk Management, because on a PC with several drives the system disk is not always number 0. Microsoft's documentation adds two caveats: after the conversion you must switch the firmware to UEFI mode, and a disk with BitLocker-encrypted volumes needs protection suspended before conversion. Back up important data first, because the tool itself warns the change cannot be undone.
Step 4: enable TPM 2.0 in the BIOS
Modern boards do not need a separate TPM module. The chip is built into the processor: Intel calls it Platform Trust Technology (PTT), AMD firmware TPM (fTPM). The BIOS may label the same function in several ways, and where it sits depends on the maker. You usually enter the BIOS with the Delete key at startup.
ASUS
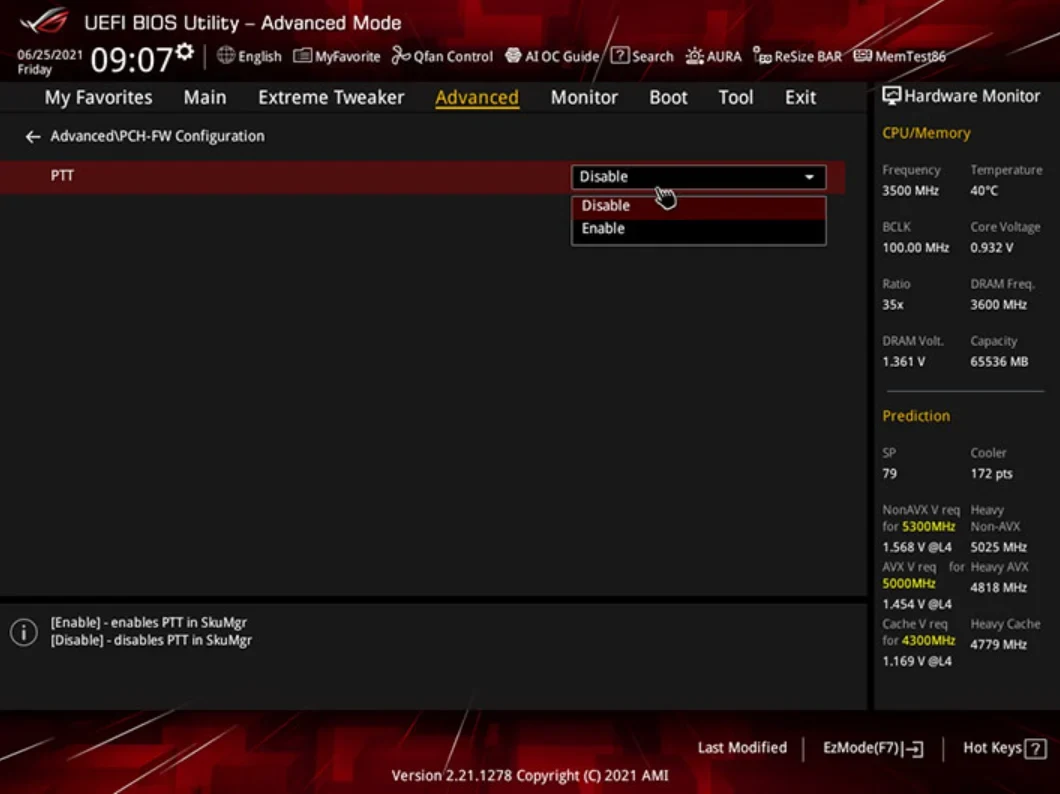
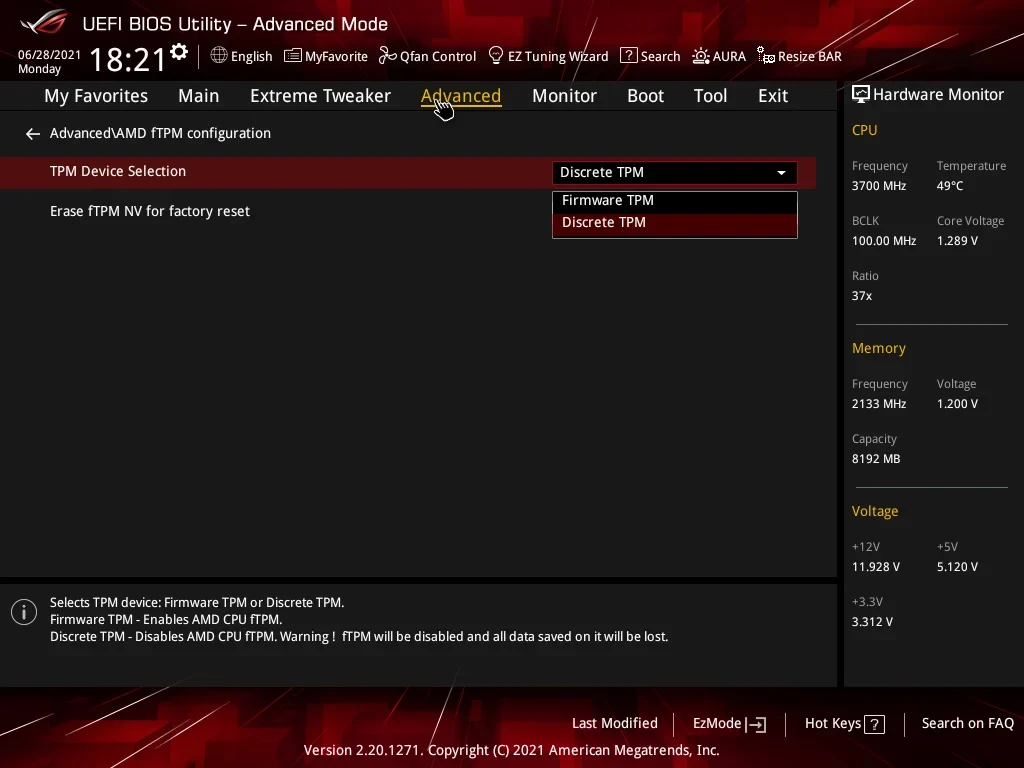
According to ASUS's official instructions (updated in August 2026), on Intel boards go to Advanced, then PCH-FW Configuration, and set PTT to Enable. After the change a window with a BitLocker warning appears, which you confirm with OK, and F10 then saves and restarts the PC. On AMD boards go to Advanced, AMD fTPM configuration and in the TPM Device Selection field pick Firmware TPM. You can also check the TPM version inside the BIOS, under Advanced, Trusted Computing.
MSI
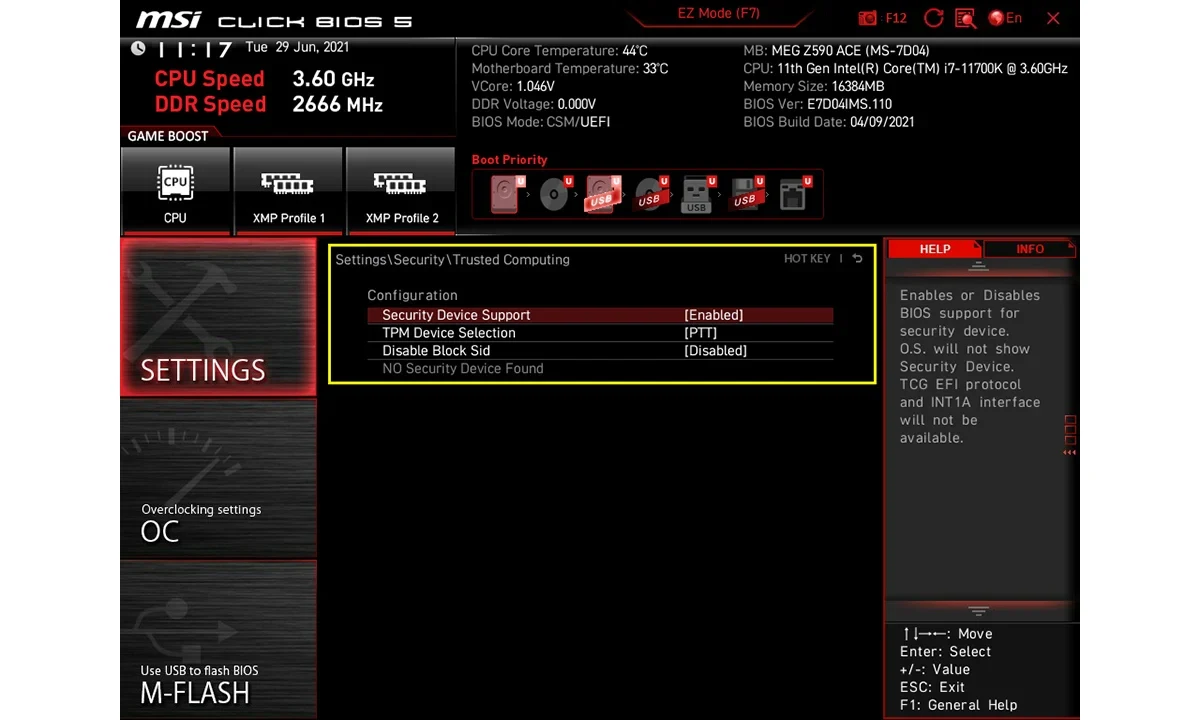
On MSI boards with the Click BIOS 5 interface, the Security Device Support option sits under Settings, Security, Trusted Computing. Enable it, then choose PTT on an Intel board or AMD CPU fTPM on an AMD board. In the older Click BIOS (GSE Lite) variant the same item is under Security, Trusted Computing. Save and exit with F10, and when you come back into the BIOS you will see the TPM version. That is how MSI's official post describes it.
Gigabyte
The official Gigabyte guide from October 2025 covers AM4 and sTRX4 boards: go to Advanced Mode, Settings, AMD CPU fTPM and choose Enabled. On the newer AM5 and sTR5 platforms with Windows 11 the document says these features are usually on by default, so check tpm.msc before changing anything. For Gigabyte boards with an Intel processor we found no exact path to the PTT option in official materials. Look for it in Settings under the name Intel Platform Trust Technology, and if it is missing, start with a BIOS update: Gigabyte's guide recommends that in general when TPM and Secure Boot options are absent.
ASRock
In ASRock's FAQ, Intel boards have an Intel Platform Trust Technology option on the Security page that has to be enabled (supported from the 300-series chipsets). On AMD boards go to Advanced, CPU Configuration and switch the AMD fTPM switch to AMD CPU fTPM (AM4 from the 300 series, AM5 from the 600 series). ASRock recommends disabling CSM first on a fresh Windows 11 install, and only then enabling PTT or fTPM.
Step 5: enable Secure Boot
Order matters here. In most BIOSes the Secure Boot option is locked while CSM (Compatibility Support Module, the legacy BIOS compatibility mode) is on, so you disable CSM first and only then set Secure Boot. The vendors suggest slightly different variants, so each of the four brands below has its own path.
ASUS
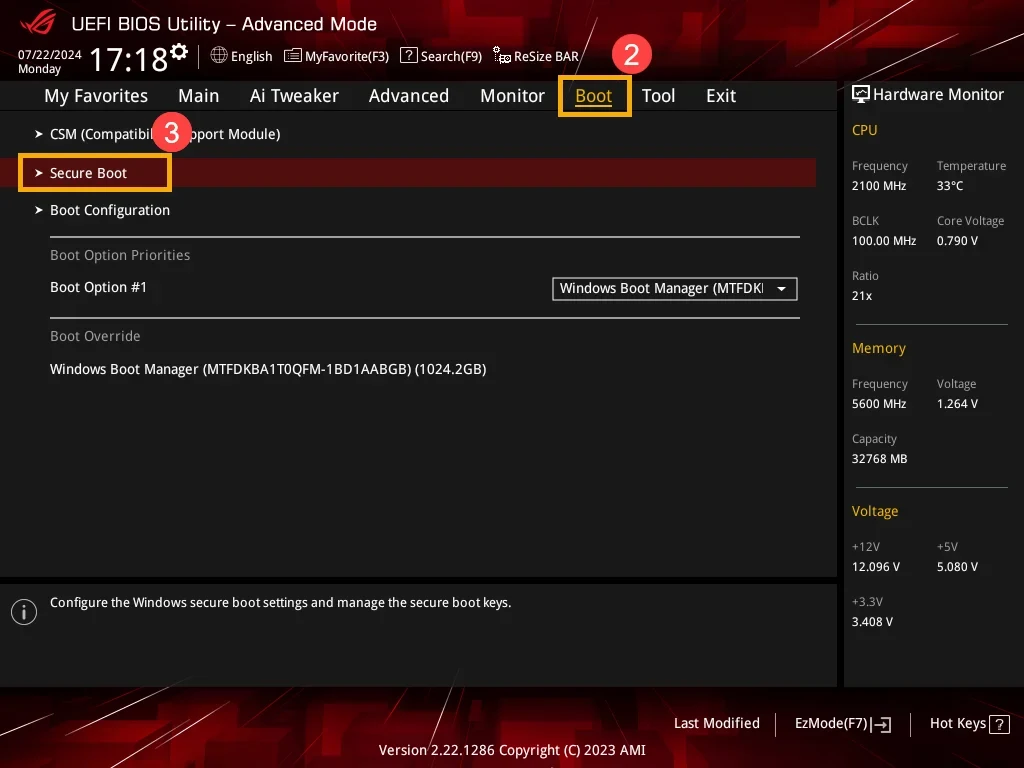
In the BIOS press F7 to switch from EZ Mode to Advanced Mode, open the Boot tab and choose Secure Boot. In the OS Type field select Windows UEFI mode: that value turns Secure Boot on, while Other OS turns it off. The Secure Boot state field reads User when keys are stored in the board and Setup when there are none. Save with F10. This is how ASUS's official guide (updated in June 2026) puts it.
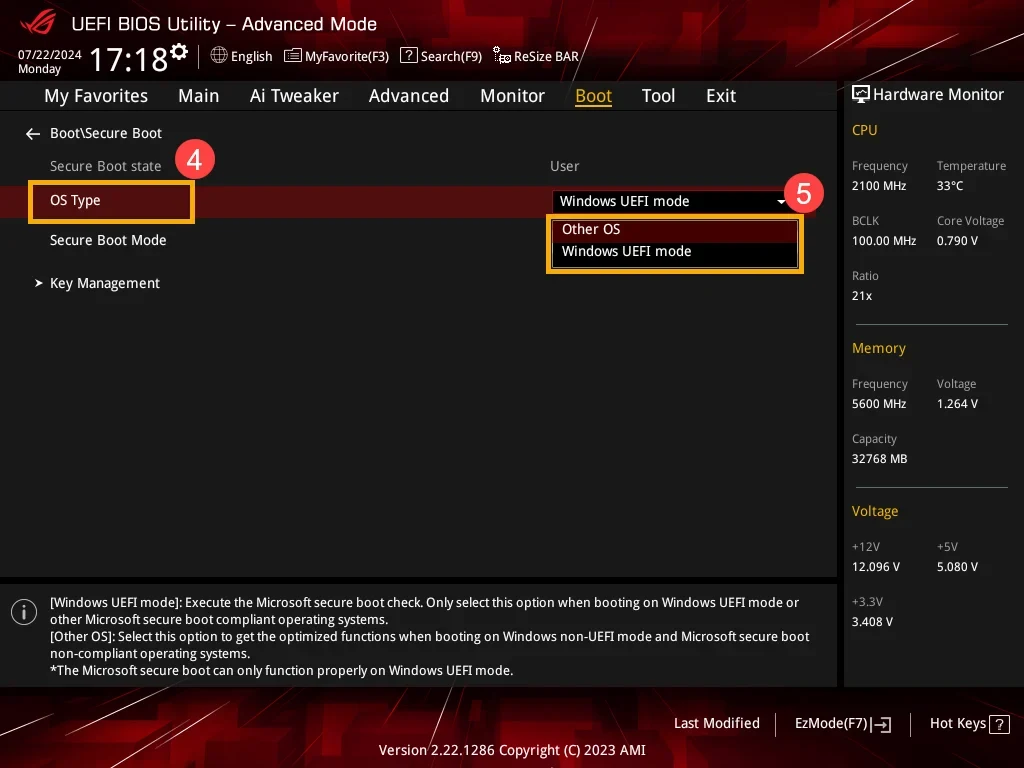
If Windows still shows Secure Boot as inactive, ASUS suggests restoring the factory keys. Set Secure Boot Mode to Custom, choose Key Management and Clear Secure Boot Keys with a Yes confirmation, then Install Default Secure Boot Keys, also confirmed, and finally save with F10.
MSI
FACEIT describes a separate procedure for MSI, because on some boards of this brand Secure Boot does not work properly with default settings even though the BIOS and Windows show it as enabled. On a recent BIOS press Delete at startup, go to Settings, Security, Secure Boot, set Secure Boot Mode to Custom and Secure Boot Preset to Maximum Security, and save with F10. On an older BIOS, Custom mode opens Image Execution Policy, where the Removable Media and Fixed Media fields must be set to Deny Execute. If you see neither option, the BIOS needs an update. All of it is in the article on the "Please set Secure Boot preset to Maximum Security" error.
Gigabyte
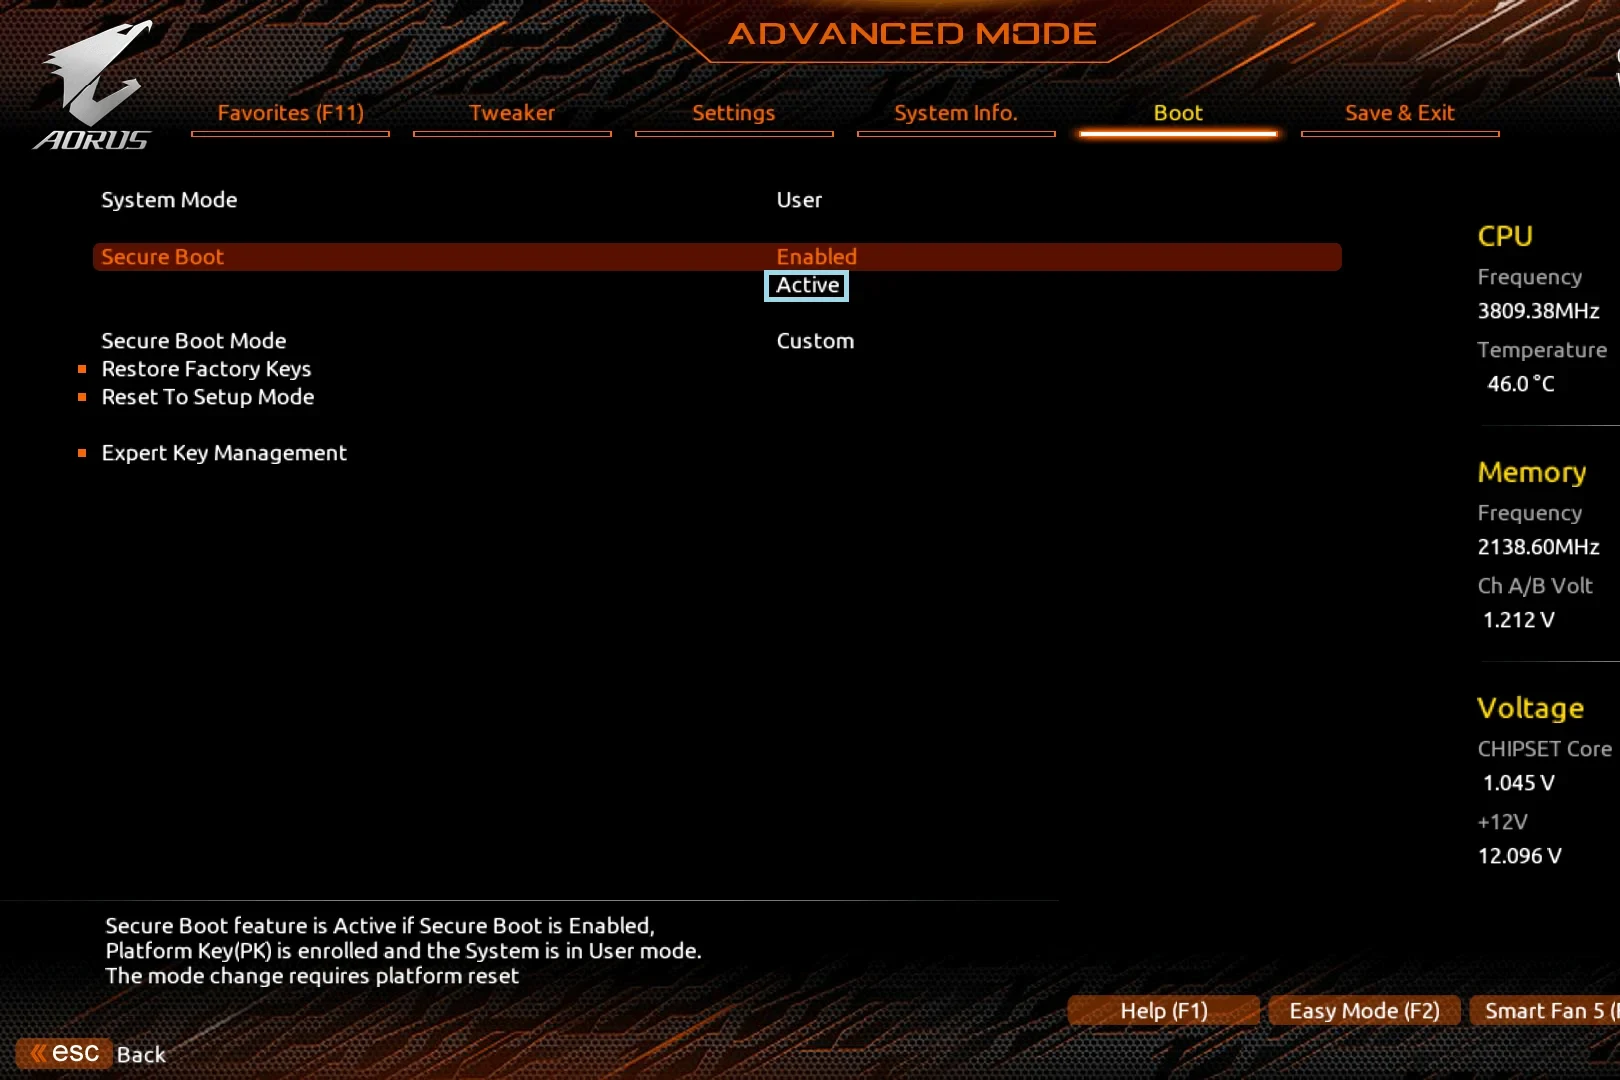
FACEIT gives the short version: disable CSM, open the Secure Boot menu, set Secure Boot Mode to Standard and Secure Boot to Enabled. Gigabyte's own instruction for AM4 and sTRX4 boards is longer. Under Advanced Mode, Boot, CSM Support choose Disabled, and Secure Boot will appear. Set Secure Boot Mode to Custom, confirm the two prompts about installing factory keys (Install Factory Defaults, then Reset Without Saving), and after the restart check that Active shows under Secure Boot Enabled.
Both versions make sense: start with FACEIT's, and if Secure Boot stays Not Active, move to Gigabyte's procedure with the key restore.
ASRock
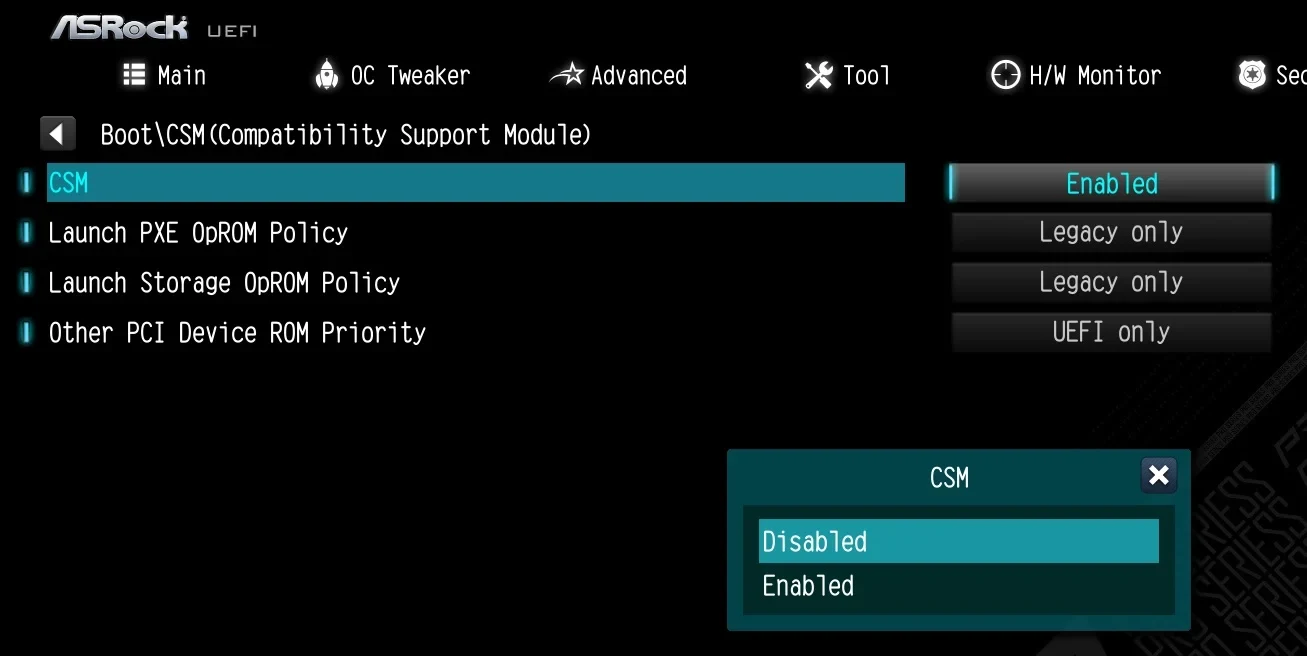
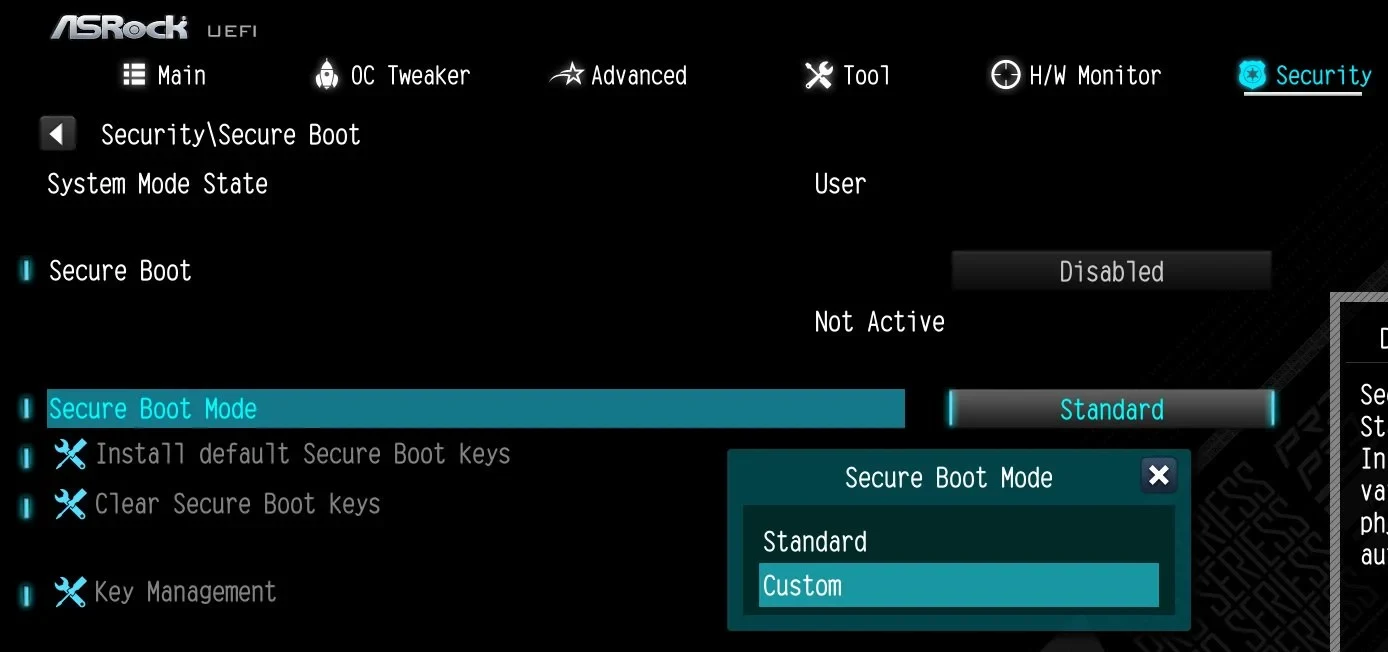
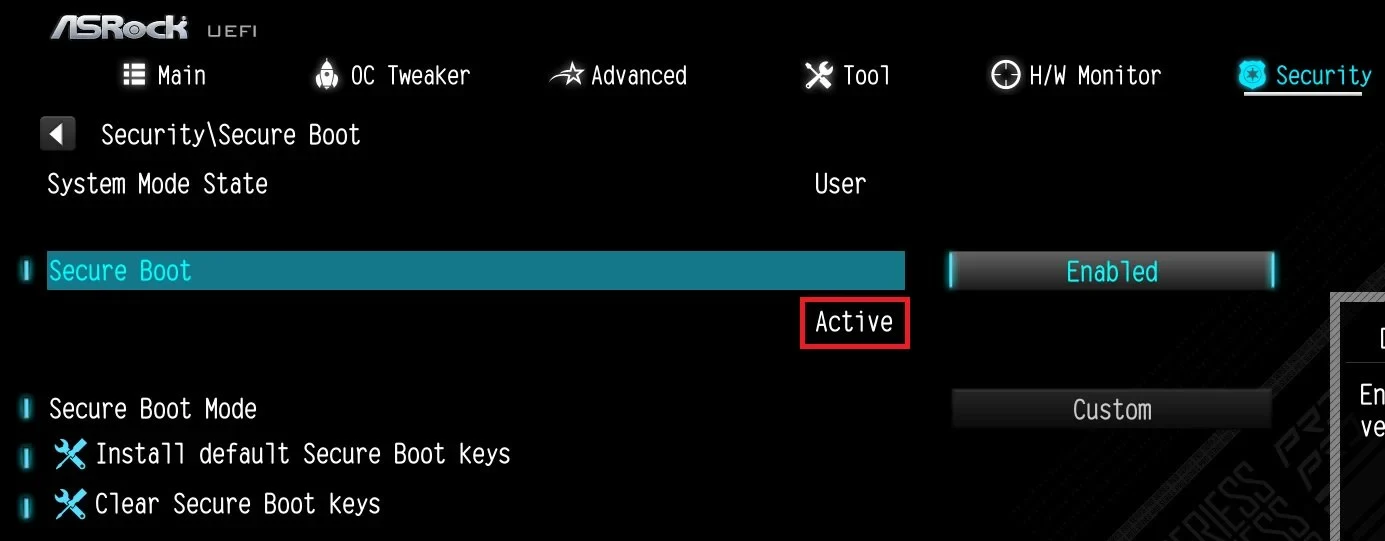
According to ASRock's FAQ, press F2 at startup, go to Boot, CSM (Compatibility Support Module) and set CSM to Disabled, then save with F10. Next open Security, Secure Boot, set Secure Boot Mode to Custom and choose Install default Secure Boot keys, confirming with Yes. Finally set Secure Boot to Enabled, save with F10, and after the restart check that Security, Secure Boot shows Active. On the AM5 platform a Discard Changes and Exit prompt may appear after you choose to install the keys: choose No and carry on to enabling Secure Boot.
When FACEIT still reports an error
TPM attestation is not ready or failed. On AMD processors, check the Manufacturer Name and Manufacturer Version fields in tpm.msc. If the maker is AMD and the version looks like 3.*.0.* (for example 3.92.0.5), FACEIT points to a known TPM firmware bug that requires a BIOS update. FACEIT collects links to fixed BIOSes from Acer, ASRock, BIOSTAR, Colorful, Dell, Gigabyte, HP and MSI. With MSI the standard release may not carry the fix yet and you may need the latest beta. For the AM4 platform ASRock specifies that the correct fTPM version is 3.*.2.*, and that a fixed fTPM exists only for Raven2, Picasso, Matisse, Renoir, Cezanne and Vermeer processors, so a CPU outside that list will not meet the requirement. We covered the related AMD TPM flaws in our piece on the Ryzen TPM vulnerabilities and the BIOS update. If Attestation is still not Ready after the update, ASRock tells you to check your network connection and restart the PC. You can check attestation with the command windowsdefender://securityprocessor typed into the Run window (Win + R).
FACEIT lists two other scenarios. With discrete TPM modules (dTPM) a faulty chip can cause the error, and the fix is to switch to fTPM. The other involves internet cafes using CCU Cloud Update, which interferes with TPM. In other cases a BIOS update usually helps: find your board model in msinfo32 under BaseBoard Manufacturer and BaseBoard Product.
Please set Secure Boot preset to "Maximum Security". This message concerns MSI boards and is covered in the MSI section above. On other makers' boards, FACEIT says a BIOS update helps.
Please enable Memory Integrity. Some players have to enable Memory Integrity in Windows Security. If the option is missing, check that virtualization is enabled in the BIOS: Intel VT-x or AMD SVM. If you get blue screens after turning it on, FACEIT advises updating Windows and the BIOS and uninstalling old anti-cheat software. IOMMU, meaning VT-d on Intel and IOMMU or AMD-Vi on AMD, is switched on separately in the BIOS and its name depends on the board.
The PC will not start after enabling Secure Boot. The usual cause is UEFI mode combined with an MBR disk. Disable Secure Boot to get back into Windows and do step 3 with the GPT conversion. FACEIT adds that when problems appear it is worth reverting the last change, updating the BIOS and enabling the features one by one.
Secure Boot certificates are expiring: is it your problem
There is a lot of panic online around the 2011 Secure Boot certificates, so we checked it at the source. Microsoft gives three dates: Microsoft Corporation KEK CA 2011 expired on 24 June 2026, Microsoft UEFI CA 2011 expired on 27 June 2026, and Microsoft Windows Production PCA 2011, which signs the Windows bootloader, expires on 19 October 2026. The 2023 certificates, among them Windows UEFI CA 2023, are meant to replace them.
According to Microsoft, a PC without the new certificates keeps starting and receives normal Windows updates. It loses the ability to receive new protections for the early boot phase: fixes for Windows Boot Manager, the Secure Boot databases and revocation lists. Most devices will get the new certificates automatically through Windows Update, and manufacturers release firmware updates where needed. We found nothing in FACEIT's documentation saying the anti-cheat requires these certificates, so we do not claim that missing ones will lock you out of a match.
What to do about it? With default settings it is enough to keep Secure Boot and Windows Update on, and the PC will fetch the certificates itself. If Windows Update does not deliver them, ASRock describes a second route: install the latest BIOS from the manufacturer's site, go to Security, Secure Boot, set Custom mode, choose Key Management, Clear Secure Boot Keys, and then Install Default Secure Boot Keys. You verify the result in Key Management: KEK should list Microsoft Corporation KEK 2K CA 2023 and DB should list, among others, Windows UEFI CA 2023. After a BIOS update Windows may ask for the BitLocker key, so go back to step 1.
If you see a Secure Boot Violation or Invalid Signature Detected screen after a restart, FACEIT describes three steps in its guide: temporarily disable Secure Boot in the BIOS to get back into Windows, update the BIOS to the latest version, then enable Secure Boot again. If that does not help, FACEIT gives a procedure with a FAT32 USB stick and the SecureBootRecovery.efi file from C:\Windows\Boot\EFI, which is copied as bootx64.efi into the EFI\BOOT folder and then booted from. We have not tested that last procedure, so we cite it from FACEIT and suggest following the original step by step.
What next
Once every field in Windows is green, the anti-cheat will start without hardware messages. If you play on FACEIT regularly, take a look at the Spawnsy Faceit extension, which shows levels 11-20, the average ELO of both teams and win chances right in the matchroom, and find pro player setups in the CS2 crosshair database.

Comments
Discussion
Join the conversation around this story.
Join the discussion
Sign in to comment and reply to other readers.
Sign inNo comments yet
Start the discussion first.